Planet R - A world so terrible that no name could adequately describe it. Magnetic fields surrounding the planet can suddenly go into disarray, causing nearby warships and spacecraft to implode like crushed cans, obliterating entire fleets in an instant.
Instance Information[]
Quest: Destroy all enemy warships in this round.
- Max Players: 1
- Max Fleets: 4
- Checkpoints: 1
- Exp: 500
Enemy Units[]
Checkpoint 1[]
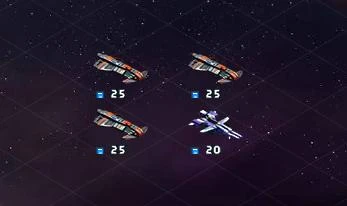
This is just three of the same fleets you encountered in 01 Ancestral Recall.
3 x 1-Ballistic (Fleet)[]
- Ships: 25 x Estrella-II Battleships in 4 groups (5/5/5/10)
- Armaments: 6 x Rapid Rife-III Ballistic,
- Defenses: 1 x Power Pulse Cannon-III
- Commander: Angla Lv 6, Min Range, Closest Target
One fleet of missile boats, the first ones seen in an instance.
1 x 3-Missile (Fleet)[]
- Ships: 20 x Typhoon-III Cruisers in 4 groups (5/5/5/5)
- Armaments: 8 x Rocket Frame-III Missile ,
- Defenses: 1 x Particle Stun Shield-III
- Commander: Angla Lv 6, Max Range, Max Attack Power
Reward[]
![]() Lv 2 Treasure Box: random chance of having one of the following items.
Lv 2 Treasure Box: random chance of having one of the following items.
 1000 - 2000 (30% chance)
 1000 - 2000 (30% chance)
 1000 - 2000 (30% chance)
- Gravity Maintenance Facility (Blueprint) - Structure (3.3% chance)
- Particle Stun Shield (Blueprint) - Shield (3.3% chance)
- Atomic Framework (Blueprint) - Structure (3.3% chance)
Strategy[]
The enemy missile fleet packs a punch but is only a small number of ships and only fires once every 3 rounds. Shouldn't be a problem if you are using Nano armor. Your weapon of choice should be either magnetic or missiles. Anti-Aircraft Cannon help if you have a small fleet and can fit enough of them into a Tank design (each one only has a 30% chance to intercept, so you will want 3-4 modules in each ship). Note that the enemy missile fleet is set to long range/max attack, so your missile resistant ships should be in your fleet with the highest attack value.
The ballsistic fleets can be a problem as they tend to gang up on a single one of yours. They fire every round, so you will want to take them out asap.
Recommended builds: Use the same Wiekes GC frigate design recommended in the previous instance , just build more of them. Have a total of 240 ships divided into 4 fleets. Deploying them in a diagonal formation leaves none of the stacks vulnerable to flanking attacks, although it does cut down on your own damage output. While more vulnerable, using multiple smaller fleets spreads out your attack power and thus should take out more enemies in less time than if you concentrated all your ships into a single large fleet.
Each fleet should have 60 ships (can be done with less using tech upgrades) in the following formation:
| 1st File | 2nd File | 3rd File | Attack Power | |
|---|---|---|---|---|
| 1st Rank | 20 Wiekes | - | - | 100% |
| 2nd Rank | - | 20 Wiekes | - | 90% |
| 3rd Rank | - | - | 20 Wiekes | 75% |
Alternatively, send one of the fleets to attack the enemy Typhoons directly, by changing orders to min range/max attack power.
